(Bilingual Post)
คนที่ใช้กล้อง Canon v1 ทราบดีว่ากล้องรุ่นนี้ไม่มี View finder หรือช่องมองภาพ ซึ่งทำความลำบากให้กับสายถ่ายภาพ เพราะเวลาเจอแสงแดงแรง หรือแสงสว่าง มันจะมองจอไม่ชัด ทำให้การจัด composition ของภาพทำได้ลำบาก แล้วเราจะแก้ป้ญหานี้ได้อย่างไร ก็เพิ่มค่าความสว่างของจอภาพให้เต็มสุด มันก็ยังเอาไม่ค่อยอยู่เลย ผมเคยอ่าน comment ต่างๆ ในเว็บหลายๆ เว็บ เห็นบางคนบอกว่า Viewfinder สำหรับเขานั้นเป็นเรื่องสำคัญ ไม่มีตัวนี้ก็บอกผ่านกล้องรุ่นนี้ไปเลย อันนี้ก็แล้วแต่คน บางคนก็เห็นว่าไม่ใช่เรื่องใหญ่ เพราะทุกวันนี้ใช้โทรศัพท์มือถือก็มองแต่จอ LCD จนชินแล้ว และโดยข้อเท็จจริงแล้ว กล้องรุ่นนี้มันถูกดีไซน์ไว้เป็นกล้องสำหรับการ Vlogging ซึ่งเน้นวิดีโอเป็นหลักอยู่แล้ว Viewfinder จึงถูกตัดออกไป ประกอบกับลักษณะของกล้องซึ่งขนาดมันก็หนามากอยู่แล้ว เพราะมีพัดลมระบายความร้อนในตัวกล้อง จึงไม่มีพื้นที่จะอัด Viewfinder ลงไป แต่สำหรับสายภาพนิ่ง การมี Viewfinder ก็เป็นเรื่องที่ผู้ชอบถ่ายภาพส่วนใหญ่ถามหา
สำหรับผม ไม่มี Viewfinder ก็ไม่ได้เป็นเรื่องใหญ่มากนัก แต่ถ้ามันมีได้ก็ดีเหมือนกัน บังเอิญจริงๆ ครับ เมื่อไม่กี่วันที่ผ่านมา ผมได้รื้ออุปกรณ์ต่างๆ เกี่ยวกับกล้องเพื่อจัดให้มันเข้าที่เข้าทาง เพระมันมีหลายชิ้นหลายประเภท อุปกรณ์บางตัวก็แทบไม่เคยใช้งาน หรือบางตัวก็ลืมไปแล้วว่าเราก็มี แล้วดันไปเจอ External optical viewfinder อายุ 10 กว่าปีเข้าให้ ซึ่งเป็นอุปกรณ์ที่ผมลืมไปแล้วว่าผมเคยซื้อไว้ คือ Ricoh External Viewfinder GV-1 เป็น Viewfinder ที่ออกแบบมาสำหรับกล้อง Ricoh GR III เท่าที่ค้นข้อมูลดูเห็นว่าใช้กับกล้องรุ่น GR ได้แทบทุกรุ่น (ยกเว้น GR IIIx) ผมไม่เคยใช้กล้อง Ricoh ตระกูล GR ที่ผมซื้อ GV-1 มาใช้ เข้าใจว่าตัวเองซื้อมาใช้กับกล้อง Olympus E-P2 เมื่อราวๆ ปี 2553
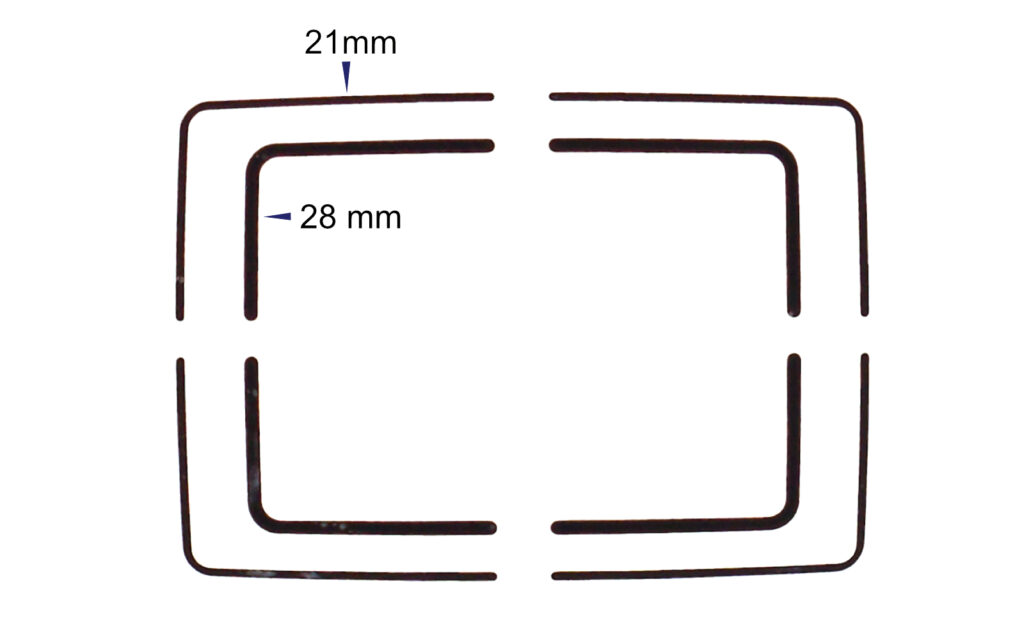
Ricoh GV-1 ตัวนี้ออกแบบมาสำหรับกล้อง APS-C ซึ่งแน่นอนว่าระยะโฟกัสมันไม่ตรงกับระบบของกล้อง Canon V1 ซึ่งมีขนาดใกล้เคียงกับ M4/3 แต่ใช้ Aspect Ratio 3:2 โดยที่ GV-1 มันเป็น Optical viewfinder มันไม่ใช่ Electronic viewfinder มันจึงไม่สะท้อนตรงกับภาพที่กล้องเห็น มันจะแสดงเส้นกรอบ (Framelines) ทางยาวโฟกัสได้ 2 ระยะ คือที่ 21mm และ 28mm (เทียบกับ Full frame) เท่านั้น ในขณะกล้อง Canon V1 มันมีทางยาวโฟกัสอยู่ที่ 16-50mm ดังนั้น การใช้งานของ Viewfinder ในการจัดวาง Composition ของภาพ จึงเป็นการจัดวางเฟรมแบบคร่าวๆ เท่านั้น
เมื่อมองดูรายละเอียดของเส้นกรอบของ Viewfinder ตัวนี้ มันมี 2 กรอบ คือ กรอบนอกลักษณะเส้นกรอบบางกว่า คือ ทางยาวโฟกัสที่ 21mm ส่วนกรอบในซึ่งลักษณะเส้นหนากว่า คือ ทางยาวโฟกัสที่ 28mm (นี่จึงเป็นเหตุผลหนึ่งที่ว่า มันใช้กับกล้อง Ricoh GR IIIx ไม่ได้ เพราะมันมีทางยาวโฟกัสที่ 40mm)
.
ถ้าเราต้องการวางเฟรมใน Viewfinder ให้มันตรงกับทางยาวโฟกัสของกล้อง ในหลักการก็ต้องปรับซูมกล้องให้ตรงกับทางยาวโฟกัสของ Viewfinder คือที่ระยะ 21mm หรือ 28mm แต่ในการใช้งานจริง มันตั้งระยะได้เฉพาะการถ่ายภาพนิ่งเท่านั้น และต้องตั้งค่าล่วงหน้าก่อนจะถ่ายตามระยะที่ 21mm และ 28mm อีกประการหนึ่ง ถ้าเราจะซูมเข้าซูมออกแล้วดูภาพผ่าน Viewfinder โดยที่มันเป็น External optical viewfinder จึงทำให้มุมมองของภาพมันไม่มีการเปลี่ยนแปลง ทำให้เรายังพึ่งจอ LCD อยู่ดี
.
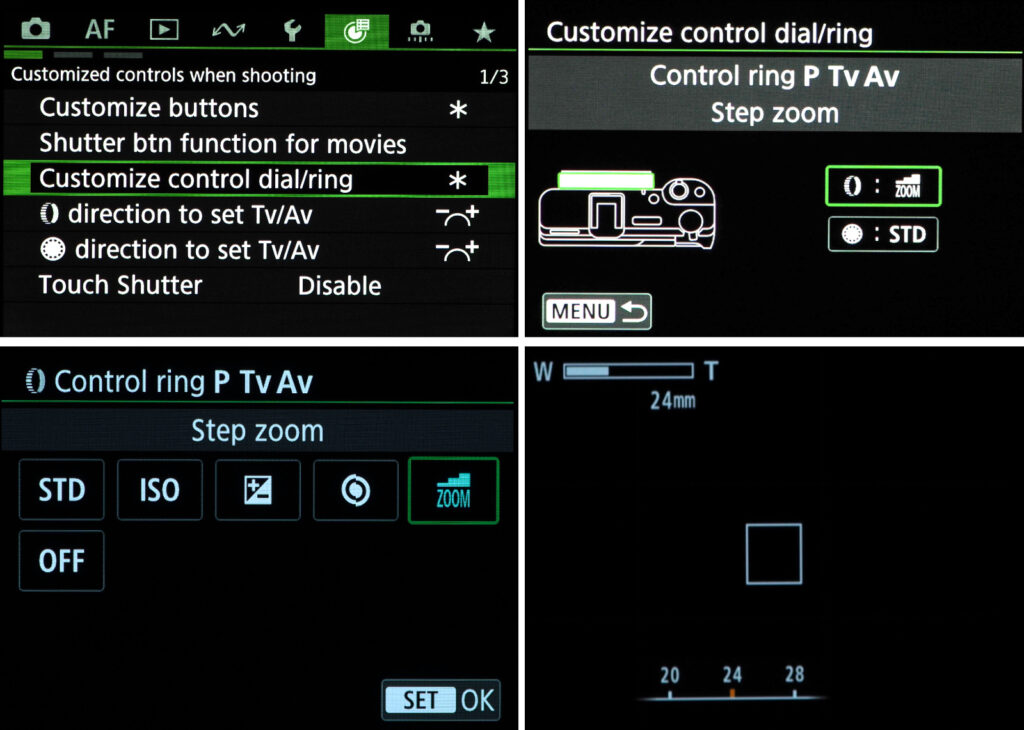
ปกติเมื่อเราซูมเข้าซูมออก ที่จอ LCD มันจะแสดงระยะทางการซูม โดยหน่วยการวัดเป็น m/cm หรือ ft/in ไม่ใช่ mm การจะเปลี่ยนให้มันเป็น mm เพื่อให้เราตั้งระยะทางยาวโฟกัสให้ตรงกับ Viewfinder เราต้องกำหนดให้วงแหวนควบคุมเลนส์แสดงระยะทางยาวโฟกัส โดยต้องเลือกที่แถบเมนู ฟังก์ชั่นการควบคุมที่กำหนดเอง (Control Customization Functions) แล้วเลือกแถบเมนูย่อยแถบแรก ตามด้วยเมนูย่อย ปรับปุ่มหมุนควบคุม/แหวนควบคุม (Customize control dial/ring) แล้วเลือกแหวนควบคุม (Control ring) P Tv Av ตามด้วยตัวเลือก ตั้งค่าซูม (Step zoom) โดยที่การตั้งค่าซูมมันเป็นแบบ Step zoom คือ ตั้งได้เฉพาะที่ระยะ 20/24/28/35/50mm เท่านั้น ดังนั้น Viewfinder จะแม่นยำก็ที่ระยะ 28mm ส่วนระยะ 20mm ก็ถือว่าใกล้เคียงกับ 21mm อยู่ ภาพด้านล่างเป็นการแสดงการตั้งค่าเมนูตามที่อธิบายมานี้
.

สรุปว่า เมื่อมี External optical viewfinder มันย่อมดีกว่าไม่มี แม้นำมาใช้งานได้ไม่เต็มร้อยก็ตาม ผมเองก็ไม่ได้เสียบ Viewfinder ไว้บน Hot Shoe ตลอดเวลาแต่อย่างใด ใช้เมื่อจำเป็นเท่านั้น
(มีวิดีโอสั้นๆ อยู่ท้ายบทความภาษาอังกฤษ)
Canon V1 Accessories III
Anyone who uses Canon V1 camera knows well that this camera model does not have a viewfinder, which can be inconvenient for photographers. When shooting in bright sunlight or bright conditions, the LCD screen becomes hard to see, making it difficult to compose shots properly.
So how can we solve this problem? One option is to increase the LCD brightness to the maximum—but even then, it doesn’t completely solve the issue. I’ve read many comments online, and some people say that without a viewfinder is a deal breaker for them.Others, however, think it’s not a big deal, since most people today get used to composing shots on their phone screens, anyway.
In fact, Canon focused on video when they primarily designed the Canon V1 as a vlogging camera. That is why they omitted the viewfinder. Additionally, the camera body is already thick and bulky because of the built-in cooling fan, leaving no room for a viewfinder.
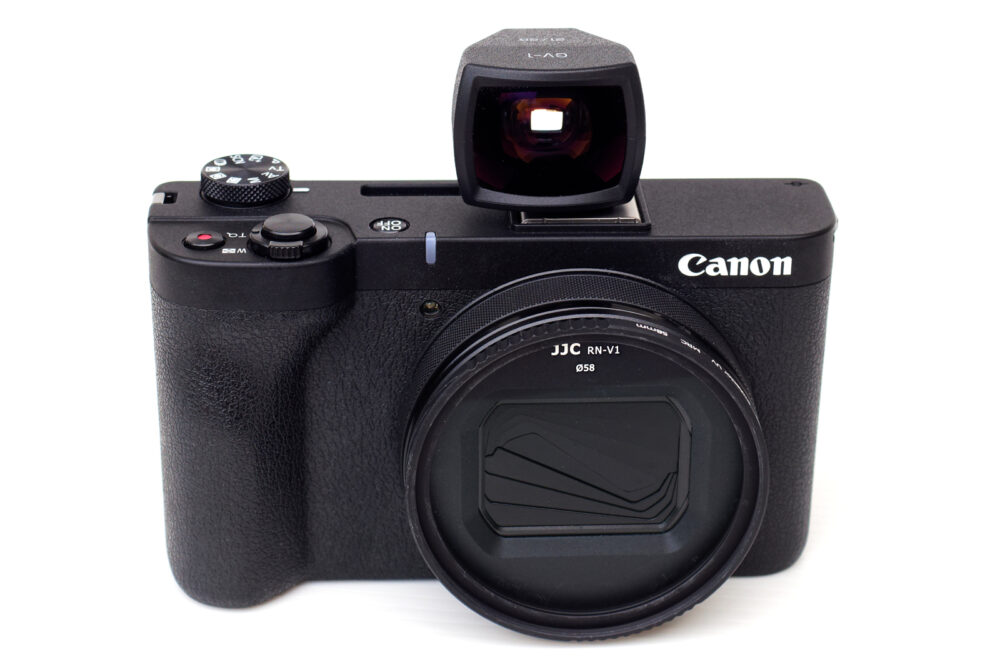
Personally, I don’t find the lack of a viewfinder to be a major issue—but having one would be nicer. By coincidence, a few days ago while I was organizing my camera gears, which includes many accessories, some barely used or long forgotten. While sorting through everything, I came across an external optical viewfinder that’s over 10 years old—a Ricoh External Viewfinder GV-1—which I had completely forgotten I owned.
Ricoh designed the GV-1 for the GR III camera. Online, I found that it can be used with nearly all Ricoh GR models (except the GR IIIx). I’ve never owned a Ricoh GR camera, but I bought the GV-1 for my Olympus E-P2 in 2010.
The Ricoh GV-1 is designed for APS-C cameras, so its focal length markings don’t exactly match those of the Canon V1, which has a sensor size similar to Micro Four Thirds (M4/3) and uses a 3:2 aspect ratio. Since the GV-1 is an optical viewfinder, not an electronic one, it doesn’t display exactly what the camera sees. It provides framelines for two focal lengths—21mm and 28mm (full-frame equivalent).
Meanwhile, the Canon V1’s zoom range is 16–50mm, meaning that when using the GV-1. The “composition” itself is an approximation.
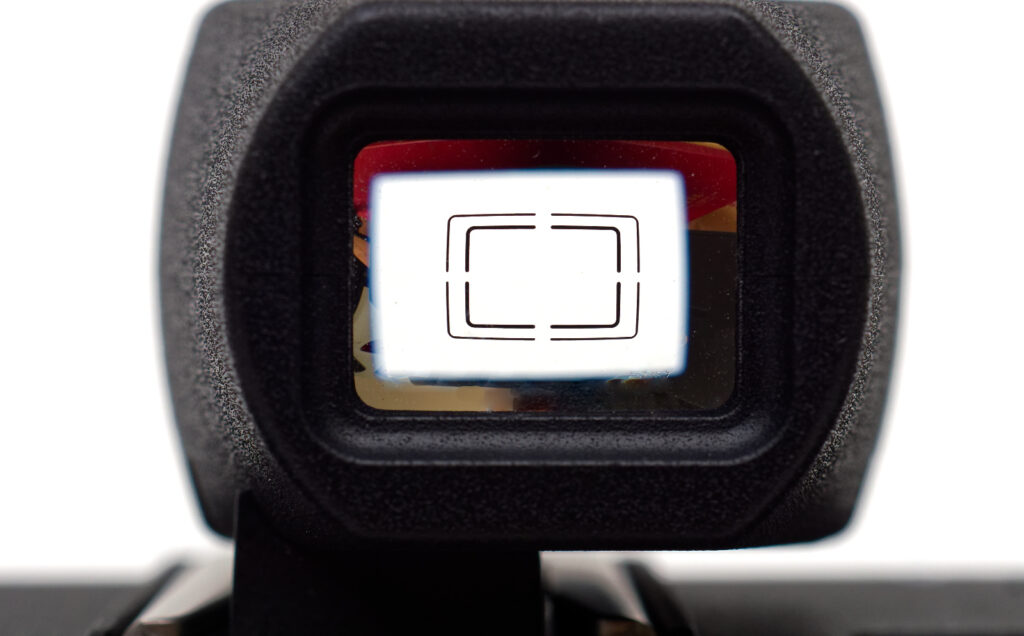
Looking at the framelines inside the viewfinder, there are two rectangles: The outer frame, with thinner line, represents the 21mm focal length. The inner frame with thicker line represents the 28mm focal length. (This explains why the Ricoh GR IIIx, which has a 40mm lens, is not compatible with the GV-1.)
.
If you want to match the camera’s focal length to the viewfinder’s framelines, in principle you would zoom the camera to either 21mm or 28mm. However, you can only set this for still photos, and you need to pre-select the focal length before shooting. Since the GV-1 is an optical viewfinder, zooming in or out won’t change the view through it, so you’ll still need to rely on the LCD screen.
Normally, when zooming, the LCD shows the zoom distance in meters/centimeters or feet/inches—not in millimeters. To make it displays the focal length in millimeters (so you can match it with the viewfinder), you must adjust the camera’s settings:
First, Go to the Control Customization Functions menu → then select the first submenu → then go to Customize control dial/ring → choose the control ring (Control Ring P / Tv / Av) → then select Step Zoom.
The Step Zoom allows setting fixed focal lengths at 20/24/28/35/50mm only. Therefore, the viewfinder will be accurate mainly at 28mm, while 20mm does not represent the focal length precisely. For other focal lengths, estimate the distance by yourself.
.
.
In conclusion, having an external optical viewfinder is definitely better than not having one at all—even if it’s not a perfect fit. Personally, I don’t keep the viewfinder mounted on the hot shoe all the time; I only use it when necessary.