
This article is for novice users of the Insta360 ONE RS by focusing on the menu system of the ONE RS 1-Inch Edition. The menu system of this camera is not much different from that of other ONE RS lens modules i.e. the ONE RS Twin Edition that have 4K Boost Lens module and 360-degree lens module. The differences are resolutions of still images and video files, audio, ISO and the Bullet time function of the 360-degree lens.
The Status of the Indicator Light
The details of the indicator light of the Insta360 ONE RS are:
Solid cyan light – The camera is in Standby mode.
Solid red light – The camera is off and charging.
No light – The camera is off and fully charged.
Flashing red light – The camera is recording the video.
Solid blue light – The camera is powering on.
Solid blue light – The camera is updating firmware.
Flashing blue light – The camera is in U-disk mode.
Flashing blue light – The card is full, error or no card inserted.
Solid green light – The camera is in WebCam mode.
You can disable the display of the indicator light. I think it’s better to display the status indicator because of the touch screen is so tiny.
Using the Touch Screen
It’s a way to access the menu system and camera settings.

Swipe down to access the shortcut menu.

Swipe up to access the media gallery.

Swipe left/right from the center to select the capture mode such as photo, video, time-lapse, etc.

Tap the bottom of the touch screen to change the parameters such as resolution, Frame rate, FlowState stabilization.

Swipe from the right edge to the center to select the mode between Auto or Manual.

The Quick Menu for selecting the preset capture modes by tapping the Q icon and the Zoom icon for zoom in or out.
The Menu System
After learning how to use the touch screen to access the menu system and camera settings. The following information is the description of each menu and submenu of the Insta360 ONE RS 1-Inch Edition.
– Shortcut Menu
The Shortcut menu has 3 pages (represented by 3 dots). You can access to page 2 and 3 by swiping from right to left. The pictures below is the shortcut menu of pages 1-3.

Page 1
– Brightness: To adjust the brightness of the touch screen.
– Lock on/off: To lock and unlock the touch screen. Normally, you will lock the touch screen for a temporary period such as when shooting under water or prevent the unintentional touching the screen that will affect the settings.
– Stabilization Level: To set the level of image stabilization from Low, Standard and High. The higher the level, the more preview the video will be delayed because of the camera takes more time to process. Anyway, it has no effect to the video file. If you want to use the camera with the tripod, better select low level.
– Indicator Light on/off: Basically, you’d better turn it on because the touch screen is small. The indicator helps you know the working status of the camera, but in some situations turn it off.
Page 2
– Grid: To display the grid which is useful for composition.
– Screen Rotation: To turn over the display on the touch screen from landscape to portrait mode.
– Voice Control: To turn on the voice command. Sometime the camera refuses to accept the voice command if you speak in the place that the ambient sound is so loud.
– Quick Capture: To turn on the Quick Capture means that while the camera is off, you can record or take pictures immediately by pressing the shutter button without pressing power button to power it on.
Page 3
SETTINGS: The Settings menu comprise various settings:
– General: This menu contains several submenus as follows:
– USB Mode: you can select the U-Disk Mode, WebCam or Quick reader (the accessory for file transfer) to connect to the computer, or Android to connect to the Android device via Micro-USB or USB Type C.
– Prompt Sound: If you turn on prompt sound, the camera will make a sound every time when you press the power button.
– Bluetooth Wakeup: If you turn it on, you can use the app in your mobile device to command the camera or use it as a remote control.
– Webcam Zoom: To turn the zoom on or off while using the camera as a webcam.
– Auto Power Off : To set a timer for shutting the camera down after 3/5/15 minutes of inactivity or never shutdown.
– Sharpness: To select the level of sharpness from Low to Medium, High and Very High
– Auto Flicker: To select from Auto, 50Hz and 60Hz.
– Language: To select the language from English, Chinese (Simplified), Japanese, German, Chinese (Traditional), Italian, and Korean.
– Reset Guide: To select between ‘Confirm’ and “Cancel’. If you select ‘Confirm’, the camera will display a short info with an illustration of each menu .
– Gyro Calibration: To perform gyroscopic calibration for making sure that you will have an accurate stabilization.
– Factory Reset: To reset the camera to factory default settings.
– Bluetooth Remote: To connect the camera to the Insta360 GPS Smart Remote which is the accessory for the camera.
– Wifi Settings: To turn wifi on/Auto On/Off and Always On.
– AirPods: To connect the camera to the Apple AirPods.
– Screen Auto Sleep: To set timer for screen auto sleep or choosing screen auto sleep during recording.
– Voice control: To elaborate the voice control menu on page 2 by choosing the language of voice command between English and Chinese. And the wordings of the voice command are: Take a photo/Start recording/Stop recording/Mark That/Shutdown camera.
– Audio Mode: To control the audio by choosing 3 options like Wind Reduction, Directional Enhancement and Stereo.
– SD Card: To format the Micro-SD card.
– Camera Info: To display the camera info like serial number, firmware version, wifi version, etc.
– Capture Modes
As mentioned in ‘Using the Touch Screen’ at the beginning of the article by swipe left/right from the center of the touch screen to select the capture mode. The ONE RS Wide Angle 1-Inch Edition has 12 capture modes by displaying 12 icons as in the illustration below but showing only 4 modes:

Using the capture mode is relevant to the parameters. Set the parameters for each capture mode by tapping the bottom of the touch screen to change the parameters such as resolution, Frame rate, FlowState stabilization, etc.
The capture modes are divided into 12 modes as 6 photo shooting modes and 6 video shooting modes. Summary of both modes are as below.
1 Burst
The continuous shooting by choosing at 16-19MP size (16:9 – 3:2), and set the timer at 3/5/10/30/60 seconds or off.
2 Starlapse
You can shoot a starlapse photo by selecting at 16-19MP size (16:9 – 3:2), and set the timer at 3/5/10/30/60 seconds.
3 Night
Shooting a photo at night or twilight by selecting the image size at 16-19MP size (16:9 – 3:2), and set the timer at 3/5/10/15 seconds.
4 Interval
Interval is like time-lapse but more advance. You can choose the image size from at 16-19MP size (16:9 – 3:2), and set the timer at every 3/5/10/30/60/120 seconds.
5 HDR Photo
This setting is for shooting a HDR (High Dynamic Range) photo.
6 Photo
The working process of the photo mode is not much different from that of the video mode. You have to choose the resolution at the bottom of the screen. Furthermore, you can set the timer of the camera for shooting photo from 3/5/10 seconds or turn off the timer. For the file format, you can choose 3 formats: Jpeg, Jpeg+Raw(DNG) and Pureshot which is the proprietary file format of the Insta360.
7 Video
Video is the main capture mode of the camera. The camera set the position for this mode at number 7/12. The ONE RS 1-Inch Edition has no Video HDR. For the parameter which can be set at the Botton of the touch screen, you can choose either ‘Flowstate’ or ‘Post’. After selecting the Aspect Ratio/Resolution of the video, choose the shutter speed as illustrated below.

Flowstate Stabilization
It’s a video stabilization adjustment. You can choose between ‘FlowState’ and ‘Post’. ‘Flowstate’ will create an instant video file for you to use but ‘Post’ means you’ll have to do some more work in post processing by using the application called ‘Insta360 Studio’. The ‘Insta360 Studio’ can be used on the Desktop or the mobile device. If you’re not satisfied with the post processing in that application, you can do color grading, noise reduction and other functions in other video post processing programs like Adobe Premiere Pro or DaVinci Resolve.
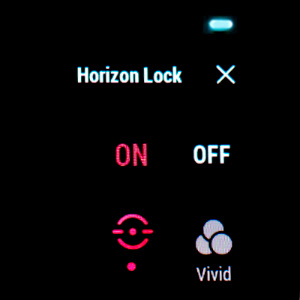
Horizon Lock
Horizon Lock keep your video file upright and level when shooting. There must be 2 conditions when you want to use the horizon lock. You must choose ‘Post’ and the frame rate at 30fps. Then the horizon lock icon will appear on the screen as shown in the picture below. You have to process the video file in ‘the Insta360 Studio’.
For shooting either video or still image, you can select ‘Auto’ and ‘Manual’. I will talk about it later on.
8 Timelapse
The camera will capture still images and combining them into a video timelapse. You can set the timer for the camera to take pictures from every 0.5 – 120 seconds.
9 TimeShift
To speed up the video, you use time shift shooting which has only an option by shooting at 5.3K (16:9) at 30fps.
10 Slow Motion
This camera has only one option in shooting only the 1920×1080 slow motion video at 120fps. But in fact, you can shoot the flowstate 4K video at 60fps and then lower the playback speed at 50% in your video post processing program. You will also get the slow motion video though it’s not as slow as shooting at 120fps.
11 Loop Recording
Loop recording allows you to set a loop duration of 1-3-5-10-15-20-25-30 minutes. After recording the specified duration, the camera will auto-delete the earliest recorded content and continuously overwrite it. You can choose not only ‘Flowstate’ or ‘Post’ but also fps and set timer as from 1-3-5-10-15-20-25-30 minutes.
12 Widescreen Mode
Shooting the wide-angle video at 5.4K, you can choose the frame rate from 24/25/30fps.
Auto and Manual Modes
As I said earlier, either shooting video or still image, you can select ‘Auto’ and ‘Manual’. And the way to do this is by swiping from the right edge to the center of the touch screen.
As implied by the name, in the manual mode you can set up everything as you wish. But the auto mode, the camera will set up almost everything for you. However, there are some parameters that the camera will allow you to customize them.
For video shooting in Auto mode, the camera allows you to customize the color by choosing Vivid, Standard and Log. You can also adjust the EV (Exposure Value) and the White Balance.
For photo shooting in Auto mode, you can adjust the EV (Exposure Value) and the White Balance.
– Quick Menu
The Quick Menu is for selecting the preset capture modes by tapping the red arrow in front of the Q icon to access the preset shooting mode e.g. C1 for shooting video at 60fps, C2 for shooting video at 30fps, C3 for shooting HDR photo, etc.
You can use the zoom in and out function by tapping the red arrow in front of the Zoom icon. Anyway, this is the digital zoom by cropping the image. You’d better use the highest resolution for your photo and video if you need to use the zoom function. The camera will display the focal length of a lens from 17-50mm as full frame equivalent.
The tables below display the capture modes and parameters of shooting photos and videos.
The Capture Modes of the Insta360 ONE RS 1-Inch Edition
|
Photo Mode |
Video Mode |
|
Standard |
Standard |
|
Nightshot |
5.4k Widescreen |
|
Starlapse |
Timelapse |
|
Interval |
TimeShift |
|
|
Slow motion |
|
|
Loop Recording |
Parameters of the photo mode of the Insta360 ONE RS 1-Inch Edition
|
Photo Mode |
Aspect Ratio & Resolution |
|
Standard/HDR/Burst Starlapse/Nightshot/Interval |
3:2 5312×3552 and 16:9 5312×2988 |
Parameters of the video mode of the Insta360 ONE RS 1-Inch Edition
|
Video – Flowstate |
4K 3840×2160 60/50/30/25/24fps 2.7K 2720×1530 60/50/30/25/24fps 1080P 1920×1080 60/50/30/25/24fps |
|
Video – Post |
5.3K 5312×2988 30/25/24fps |
|
Slow Motion |
1080P 1920×1080 120fps |
|
Timelapse |
5.3K 5312×2988 30fps |
|
TimeShift |
4K 3840×2160 30fps |
|
Loop Recording -Flowstate |
4K 3840×2160 60/50/30/25/24fps 2.7K 2720×1530 60/50/30/25/24fps 1080P 1920×1080 60/50/30/25/24fps |
|
Loop Recording -Post |
5.3K 5312×2988 30/25/24fps |
|
5.4K Widescreen |
5.4K 5472×2328 30/25/24fps |
Finally, I hope this article will be useful for the beginners or the new users of the Insta360 ONE RS 1-Inch Edition.